Mounting acoustic panels to walls and ceilings can be done in a variety of ways depending on how permanent or temporary the treatment will be. It also depends on the type and weight of the panels, and where they are being mounted. Whether manufactured or DIY, mounting considerations are important to the sound quality, height, symmetry, and spacing of the acoustic treatment.
In this guide, we discuss where to hang panels, what to consider before installation, and if there should be a gap between the panel and the wall or ceiling. We explain different methods for mounting panels to walls and ceilings, and how to secure panels so they don’t damage the walls or ceiling. We may miss some methods; however, the concepts are essentially the same. Our goal is to provide the information necessary to hang acoustic panels on walls and ceilings.

Contents (Jump to Topic)
- Where to Hang Acoustic Panels
- What to Consider Before Installing Acoustic Panels
- How Far off the Wall Should I Hang My Acoustic Panels?
- Hanging Acoustic Panels on Wall
- French Cleats
- Attaching Acoustic Panels in the Corners
- How to Hang Acoustic Panels From the Ceiling
- How To Attach Acoustic Foam Panels to Walls and Ceiling
- How to Mount Acoustic Foam Temporarily (Without Glue)
- Mounting Self-Adhesive Panels
- How to Hang Acoustic Foam Without Damaging Walls
- Conclusion
Where to Hang Acoustic Panels
Acoustic panels absorb, diffuse, and trap sound waves to reduce reverberation, echo, and standing waves. They improve the sound quality within a room or space depending on placement. The placement, including height, symmetry, and spacing of panels, affects their performance.
Place acoustic panels so they are in the reflection point or zone and treat the initial, direct, or first reflections. Hang the panels on the front, back, and side walls so they are centered on the height of the sound source and listener’s ear for the best results.
The more of the reflection point or zone that is treated, the better. If you can’t cover the whole zone, space the panels to treat as much of the zone as possible in a symmetrical pattern that is both effective and aesthetically pleasing.
Identify the reflection point or zone on the ceiling too, and treat it in a similar manner. Space the panels to cover as much of the zone as possible and maintain a symmetrical pattern. For recording, monitoring, and mixing locations, suspend a cloud to treat the reflections for better control.
Check out my article Where to Place Acoustic Panels for more information on the placement of absorbers, diffusers, traps, and clouds.
What to Consider Before Installing Acoustic Panels
There are many things to consider before installing acoustic panels. The amount and type of treatment tie in with the purpose. A professional studio is very different from a TV lounge, bar, living room, or office, so low, medium, or high treatment should be considered before purchase, as should the budget. The type of panels, permanent or temporary placement, mounting height, and the weight of the panels come into play when considering installing the panels.
Type of Panels
Acoustic panels can be of varying shapes and sizes, professionally made, manufactured for the mass market, or DIY. Consider your design style and color preferences when arranging panels for an effective and aesthetic design too. Manufactured absorbers and diffuser panels often are made of soft, porous polyurethane foam.
Professional and DIY absorption panels frequently use insulation materials like stone wool, fiberglass, cellulose, or even cotton toweling to absorb sound. Diffusers, however, commonly use hardwood, softwood, cork, or even plastic to form the towers and wells or troughs and ridges that redirect sound waves.
Foam Panels
Foam panels are lightweight, ranging from 3/8” to 2” thick, and can be arranged in alternating patterns based on their profile, shape, and color. Many are self-adhering or can be stuck to surfaces with adhesive sprays or glues. They can also be edge tacked or stapled or mounted to a thin backing material which can then be fastened to a surface.
Wood Frame Panels
Wood-framed panels may be professionally made or DIY, have an exposed frame, or be covered. They can also be of different shapes, sizes, thicknesses, and colors. The weight of the frame and core material, and whether they’re an absorber or diffuser, affect the panel weight, and thus how it can be fastened to walls or the ceiling.
Permanent or Temporary Installation
Whether you rent or own your home will affect whether the acoustic treatment is permanent or temporary, although you may prefer temporary to permanent for other reasons too. Some acoustic panels are easier to mount for temporary installations than others, and the type of wall or ceiling surface can also impact mounting decisions.
How long or often the panels will be needed may determine their installation too. If the room will require acoustic treatment for the foreseeable future, opt for more permanent and secure installation methods. For one-time or infrequent use, opt for temporary installation that can be removed and stored.
Tapping a nail or two into a wall doesn’t make for a permanent installation. However, self-adhering panels stuck to walls may cause damage to the surface when removed, making them a more permanent placement. Panels can be hung from walls and ceilings similar to pictures or hanging plants, so most installation marks can disappear under some mud and paint when the panels are removed. Panels can also be placed on stands or stacked strategically, and leave no mark on walls.
Mounting Height
Acoustic panels should be mounted so they are centered on the height of the listener’s ear, and to capture the first reflection from the sound source. Panels that are 2’x4’ and oriented vertically will dress half the wall height, so are an effective option. Panels don’t need to be floor to ceiling, provided they are placed in the reflection points or zones based on the listening or monitoring positions.
Where conversations or listening commonly occur when seated, center the panels 4’ above the floor. People standing on the floor or sitting on bar stools are listening at a different level, so center the panels between 5’ and 7’ off the floor. To treat walls where sound sources and listening heights vary from sitting to standing, alternate the pattern so alternate panels are higher than those next to them.
Leave space at corners for traps and where the walls meet the ceilings, so wall treatment shouldn’t go all the way to the ceiling. Additionally, the more furniture in the room the greater the diffusion and absorption of sound waves at the lower room level, resulting in less treatment being needed at that level. Choose a pattern that is symmetrical and spaced to effectively treat as much of the reflective point as possible within your budget.
Acoustic Panel Weight
The size and weight of panels and treatment affect mounting options. Lightweight foam panels may be glued, tacked, or even pinned into place, while heavy hardwood diffusers require more sturdy support. Lighter panels can fasten to drywall with common picture hanging methods, but heavy panels may require fasteners to be embedded into wall studs or ceiling joists or even placed on floor stands. Anchors inserted into drywall may work on walls but not be reliable for ceiling-mounted panels too.
Foam panels can weigh a couple of ounces while hardwood diffusers can easily push a hundred pounds or more depending on dimensions. Many 2’x4’ insulation-filled absorbing panels weigh between 5 and 15-pounds, with larger panels weighing more.
Heavier panels often require one or more helpers to hang them safely into place, so ask for help when needed. Select fastening methods appropriate for the weight of the panel, and don’t scrimp for the sake of the budget.
How Far off the Wall Should I Hang My Acoustic Panels?
An air space or gap between the wall and the back of the acoustic device helps improve mid and high-frequency treatment. It allows airflow across the wall behind the panel, exposes more surface area for sound treatment, and helps dissipate heat generated by sound absorption. The greater the depth of the air gap, the better the sound treatment.
The distance from the wall depends on room dimensions and available space. The thickness of the panel coupled with a 2” to 4” gap between it and the wall may protrude too far into the available space, so adjustments may need to be made. People tend to be oblivious of things hanging on walls, so to prevent damage or injury, placing furniture and other obstacles under the panels to keep people away.
Hanging Acoustic Panels on Wall
Installing acoustic panels on walls can be done in a variety of ways but depends on the size and weight of the device, and what the wall is made of. Lightweight panels can mount to the wall surface while others require fasteners embedded in the stud framework, which can also affect placement.
Some options may work better on drywall and others on concrete. Use a leveling device and remember, spacing and symmetry of design are effective control components within the reflective point or zone. Hang the panels so the pattern is both effective and aesthetically pleasing too.
Best Way to Hang Acoustic Panels
Acoustic panels with insulation-filled cores are heavier and denser than foam panels. The best way to begin is to locate the studs in the wall. Once the studs are located within the reflective point, panels can be securely fastened. Even though lightweight panels can mount to drywall, attaching them to the studs provides a more secure attachment.
An effective tool is the Franklin Sensor Stud Finder with a built-in level and ruler. Just turn it on and slide it across the wall, the Franklin model uses 13 sensors to accurately locate the studs, even through paneling, 3/4″ T&G pine planking, and plywood. The LED lights indicate where the stud or joist is, and even if it is doubled. Lightly mark the locations on the wall for reference when laying out the sound treatment pattern.
French Cleats

French cleats can be wooden, metal, or plastic devices that mount to the back of the acoustic device and interlock or overlap with a similar cleat attached to the wall. Hangman Heavy-Duty Hangers can support up to 300-pounds, and French Cleat Picture Hanger Kit up to 50-pounds, both use a similar ‘Z’ design too. Whether homemade or manufactured, French cleats broaden the support and help keep the panel level.
- Fasten one or two cleats to the back of the panel and level with the top with the hook or open receiving end facing downward.
- Attach one or two cleats level on the wall equally spaced with those on the back of the device. However, the wall-mounted cleats are oriented so the hook or open end is facing upward.
- Place the panel so its clips are above those on the wall, and gently slide the device down until the cleats lock into place.
Sawtooth Picture Hangers
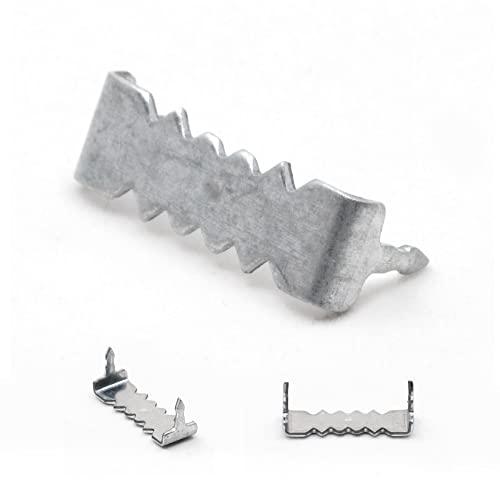 Sawtooth picture hangers are usually a 1/4″ wide strip of metal an inch or two long with one or two sawtooth edges. The teeth allow for leveling adjustment and prevent the hanger from sliding out of alignment once it is set on a nail or screw fastened into the wall. Some sawtooth hangers have holes for two fasteners, while heavy-duty hangers are thicker metal and often have four holes and support up to 250-pounds. There are even sawtooth hangers that require no nails or screws, such as Sawtooth Picture Hangers No Nail which have built-in barbs.
- Fasten sawtooth picture hangers with nails or screws to the center or equal distance from the edges on the upper back of an acoustic panel’s frame. The size and weight of the acoustic panel affect the type and number of sawtooth hangers needed.
- Identify the hanging location on the wall and drive one or two nails or screws (if two make sure they are level with each other) into the wall.
- Center the sawtooth clip on the upper frame of the panel and fasten it in place. If using two in the upper frame, ensure they are level with each other and spaced so the centers align with the nail or screw heads in the wall.
- Place the panel on the wall so the hangers are above the wall supports, and lower it until they rest on them.
- Shift left or right to align and level.
Flush Mount Brackets
 Flush mounting brackets provide a secure fastener for mounting acoustic panels to walls. The metal brackets interlock and prevent shifting or the panel from becoming askew. The metal is 0.08” thick, so there may be a 0.16” gap between the wall and frame which can be minimized by recessing the clip into the frame.
Flush mount brackets are available in different shapes and sizes and have two or four holes for fasteners. They will support various weight categories depending on the shear strength of the nail or screw used. Tiberham Interlocking Hooks, for example, work well for most acoustic panels.
- Attach the bracket to the upper center of the panel framework, or for larger or heavier panels attach two equally spaced in from the sides. The protruding section should be pointed downward. The weight of the panel determines the nail or screw size, so choose what is appropriate.
- Identify the location on the wall for the panel and mark it for one or two brackets at distances to match those on the panel. For heavy panels attempt to align with studs for greater support.
- Align the receiving brackets so they are level and the protruding section is pointed upward. Use appropriate hardware to fasten them to the wall. Screws or nails into studs, or anchors for drywall or concrete.
- Line the panel up with the wall clips, and slide it down until the brackets interlock. The panel should be level and have little or no lateral movement.
Picture Hanging Kit
 Picture hanging kits, such as Listenman D Ring Hanging Kit, commonly contain D rings, wire, and sometimes screws and wire clamps. Some kits support 10-pounds, some 30-pounds, and others 50-pounds depending on the wire and D ring gauge, and screw or nail strength. So, ensure you pick the kit that will support the panel weight.
- Screw or nail the D rings to the panel frame about 1/3 of the way down the back from the top. The rings should be the same distance down on both sides.
- Thread the wire through one D ring and twist or camp it so it is secure. Stretch it across to the other D ring and thread it through the D and twist or clamp it so it can’t slip. It should be fairly tight. Some wires will stretch with time and weight, so the less play in the wire the better.
- Locate the hanging location on the wall and identify where the top of the panel should be. Measure down from the top mark the same distance the D rings are down on the panel, and subtract an inch for stretch. Drive the nail or screw into the drywall or stud, leaving the head out enough to catch the wire. For larger or heavier panels, use two wall supports that are level with each other, and only subtract 1/2″ for stretch.
- Place the panel against the wall above the nail or screw head and slide it down until the wire catches. A paint stir stick may be helpful in hooking the wire.
- Level the panel by lightly sliding it left or right. If the panel hangs down too far or not enough, measure the distance it is off by, remove the panel, and move the nail or screw accordingly, and rehang the panel.
Other Options
The size, shape, and weight of the panels, and the location for placement may require other methods for hanging or fastening the acoustic devices. Hooks and eyes are a common method, as are eyes and zip-ties. Another creative method is hooks and chains.
Much depends on the look being sought and the practicality. Diamond or hexagonal-shaped panels can hook on a nail or screw where two frame pieces meet, so consider the spacing, height, symmetry of design and choose a practical method for hanging your acoustic devices.
Attaching Acoustic Panels in the Corners
Acoustic panels or traps used to treat corners where two walls meet can be fastened using similar methods to flat walls or with special clips or fasteners. Some corner panels are flat across the front and shaped at a 90° angle at the back to fit and fill the corner and provide deep treatment.
Other devices are similar to wall panels and just mount across the corner, leaving an open space behind. So, the size, shape, and weight of the panel will dictate the attachment method.
Corner Impalers
 Fastening acoustic devices across a corner can be done using different methods, however, corner impalers make it easier to fasten flat acoustic panels across a corner. Framed panels or those with rigid insulation cores can be impaled on specially fabricated metal corner brackets such as Primacoustic Corner Impalers.
The bracket is bent to form a 45° angle with the wall to mount flush and receive the panel on teeth angled out from the metal plate, which penetrate the back of the panel and hold it in place.
- Place or hold the panel level in the corner and mark the outside edges on the wall to identify the outermost panel edge. It may be easier to rest it on the floor and use a level to extend the marks up the wall to the desired height, and mark the height of each panel – you may want two or more to ‘stack’ in the corner.
- Measure 2” down from where the top of the panel needs to be, this is where the two impalers will fasten to the wall.
- Orient the bracket so the fold is pointed away from the corner. Fasten the two impaler plates with screws or anchors and screws so they are level.
- Push the impaler points out so the points are sticking upward at a 45° angle.
- Hold the panel so the top is 3” above the top of the bracket or an inch above the desired height. Push in at the upper corners as you slide the panel downward evenly at each side. The points of the impaler penetrate the back fabric and insulation and hold the panel in place.
How to Hang Acoustic Panels From the Ceiling
Hanging acoustic panels from the ceiling takes more time than wall mounting. Locating the joists provides both a reference and secure mounting locations depending on the size and weight of the device. Panels can be flush mounted similar to wall panels, or suspended so they hang down a couple of inches or even several feet.
The mounting method is determined by the weight, size, and purpose of the panel. Some panels will only require two mounting points, others will need three or four. For safety, fasten heavy panels to joists, use a step ladder, and have a helper since two sets of hands are better than one.
Metal Eye Hooks with Hanging Wire
 Metal eyes, hooks, and hanging wire are common methods for fastening acoustic panels to ceilings. However, zip-ties, eyes, and chain work too. Long threaded shanks on hooks such as Termath Screw Eyes are helpful for penetrating drywall and into the joists for a secure attachment.
The panel will need double the mounting points on its back for ceiling mounting compared to wall hanging. Four AxeSickle screw eyes and 30-pound picture hanging wire on the back of the panel facilitate hanging panels level. Here are two ways to use hooks and wire:
Method 1
- Fasten four eyes to the inside edges of the frame about one or two inches in from the ends.
- Thread wire through the eye closest to the ‘top’, stretch it across the panel to and through the other eye near the ‘top’. Twist or clamp the wire ends to keep the wire secure. Repeat for the two eyes at the bottom.
- Measure and mark the ceiling, preferably where the joists are, and twist the hooks into the ceiling at the marks. Have all the open sections of the hooks in the same direct toward one end or the other.
- Lift the panel up level, align it with the hooks and slide it so the hooks catch the wires.
Method 2
- Fasten four eyes to the ends or sides of the frame so they are equally spaced.
- Make a wire loop through each eye so they are the same length.
- Mark the ceiling and twist in the hooks to correspond with the eyes.
- Lift the panel and place the 4 loops over the matching hooks.
How To Attach Acoustic Foam Panels to Walls and Ceiling
Foam acoustic panels are lightweight open-cell polyurethane spongy soft foam that has been sculpted in different profiles to absorb, trap, or deflect sound waves. The panels may be different shapes, profiles, and sizes, and range in thickness from 3/8” to 2” or more. Weight and density affect performance and attachment, so it is best to follow the manufacturer’s instructions for fastening foam panels to walls and ceilings.
Some panels arrive with hanging devices or have peel-and-stick self-adhering backing for easy installation – for those that don’t, here are some suggestions:
Pro Note: Wear protective gear when using adhesives and sprays, and ensure adequate ventilation for the safety of yourself and others.
Glue Mounted
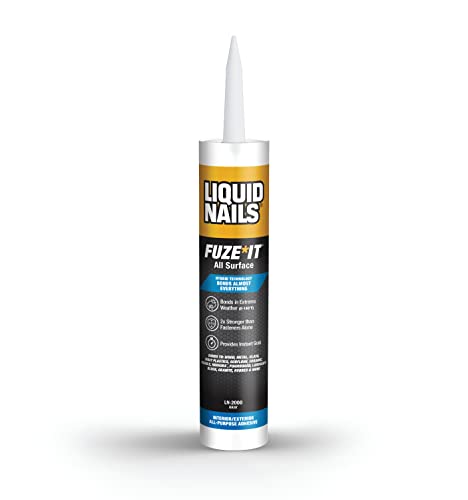 There are different types of glue available that work with polyurethane foam panels and won’t dissolve or melt the foam. Liquid Nails Fuze*It is one such product that works well with foam panels and is low-VOC and holds within 15 seconds. It also allows time for some repositioning before curing.
Simply apply a zig-zag bead to the back of the panel, spread it with a plaster paddle, icing spreader, piece of cardboard, or plastic, and repeat on the receiving wall surface. Press and hold until the glue sticks, and repeat until the acoustic treatment pattern is complete.
Spray Adhesive
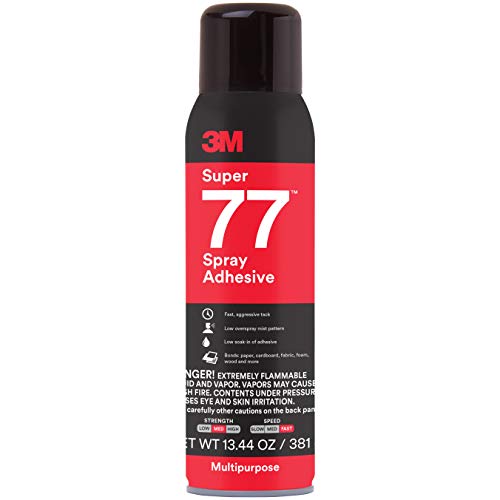 Most spray adhesives work well with polyurethane foam, but make sure the adhesive states so on the can. One tried and trusted product is 3M Super 77 Spray Adhesive. It’s low VOC, bonds within 15 seconds, and cures in 30 minutes, so there is the possibility of some repositioning. Look for an adhesive that is low soak-in or absorption since the panels are foam.
Prior to spraying, tape and cover the wall surfaces around the application area to prevent adhesive from making other surfaces sticky. For the same reason cover the floor or table surface where the panels will be sprayed. Spray the back of the panels and also the wall. Place, press, and hold until the adhesive grips the panel, and repeat until the panels are all stuck in place.
Surface Impaler Mounting Clips
 Surface impaler mounting clips, such as Primacoustic Broadway Surface Impaler Mounting Clips, are metal plates that fasten to the wall. They have barbs or points that protrude out and upward that penetrate into the back of the foam panels as they are slid downward over them.
The size of the panel determines how many impaler plates are required per placement. The clips make it easy to adjust or relocate the panels and don’t damage the walls.
T-Pins
 You may recall T-pins from science class. They are ‘T’ shaped metal pins with a wide head that prevents pinned objects from pulling through. They have a long pointed shaft that pushes easily through foam panels and into drywall or wood surfaces. Business Source 32351 T-Pins have a 9/16” head and a 2” shaft.
The number of pins depends on the size and weight of the foam panels. Easy to use, just position the foam panel, and push one pin through each corner and into the wall. The head of the pin can be flush or slightly embedded into the foam depending on the panel’s thickness. The pins make it easy to reposition or remove the panels.
How to Mount Acoustic Foam Temporarily (Without Glue)
Perforating walls with hundreds of holes or permanently sticking foam panels to them may not be homeowner friendly and could cause landlords nightmares. Happily, there are other ways to stick or fasten foam panels to walls and ceilings without doing much or any damage. How you fasten foam panels also depends on the surface finish of the wall or ceiling and the panel arrangement required or desired.
 To minimize the number of holes in the drywall or the risk of damaging the paint or drywall paper with glue, use a backer board. Stick or glue the panels to a thin backer board and mount it to the wall with one or two flush-mount brackets or hang it like a picture with wire and eyes. Attaching the foam panels to fabric and tacking it to the wall reduces the number of holes too.
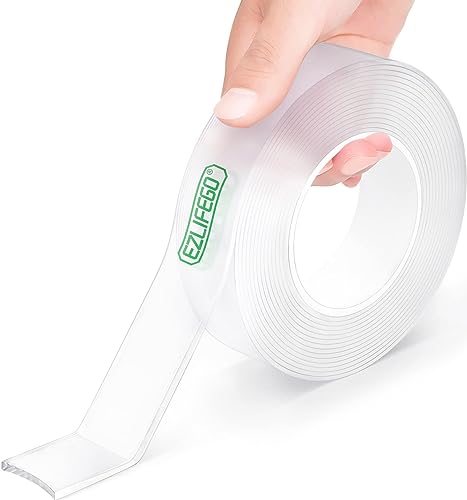
Consider using EZlifego Double Sided Tape to secure panels to wood, glass, metal, ceramic, and marble, but it’s not recommended for painted walls. Self-adhesive Velcro dots, however, work on most surfaces, including painted walls. 3M’s Command Poster Hanging Strips are another alternative that is easy to use and leaves no mark when removed from walls. Shop around and read product reviews, and choose a product or two that seems promising.
Mounting Self-Adhesive Panels
 Self-adhering panels, such as LEIYER High Density Foam Panels, have a peel-and-stick paper backing and will mount to most smooth surfaces. Just wash the wall or ceiling, let it dry, peel off the protective paper, orient in the desired pattern, place in location, and press. The harder you press, the more secure the adhesion, so lightly tack the panels into place first, so they can be adjusted, and then press harder once the pattern is complete.
The sticky panels work well on doors, windows, plastic, metal, and smooth painted surfaces. They’ll even stick to masonry but require more pressure to ensure adhesion. Although the panels go up easily, they don’t come off easily. Once stuck, the panels are quasi-permanent. The self-adhesive panels do not peel off easily and can damage the wall surface when removed, or the foam may tear. Consider sticking them to a backer board or fabric sheet and then fastening the board or cloth to the wall for easier removal.
How to Hang Acoustic Foam Without Damaging Walls
Whether you’re a homeowner or renter, it’s good to know how to hang foam acoustic panels so they won’t damage walls. The weight of the panels individually and collectively, plus their arrangement on the wall or ceiling, determines how they can be hung. The definition of damage is also important too.
Some landlords and homeowners consider pin, screw, and nail holes damage even though they disappear with a bit of putty and a fresh coat of paint. Others view chipped paint or peeled drywall paper as more damaging since it is more difficult to mask. It should also be noted that holes in the drywall barrier can allow sound wave penetration which can add to the noise you’re trying to prevent with the foam panels.
Tacking or pinning foam panels using one to four T-pins – depending on panel weight – will leave pinholes in drywall. Using impalers or picture wire, hooks, and eyes will also leave holes. Although the holes easily disappear when panels are removed, some landlords prohibit tack, pin, nail, and screw holes. Don’t despair! There are alternatives that do work and leave no mark upon removal.
Acoustic foam panels are usually lightweight, so it doesn’t take much to hold them in place. Command adhesive strips, Velcro strips, and hooks hold up to 16-pounds or more and don’t damage walls when removed, making them a damage-free choice. They’re easy to attach to drywall, masonry, and concrete walls, glass, metal, and even wood, and to foam panels too.
Conclusion
There are a variety of ways to hang acoustic panels to walls and ceilings to cover the reflection points or zones. Some methods will leave marks or holes as they require nails, screws, or adhesives.
Command strips, Velcro, or hooks will hold foam panels and light-weight insulation-filled panels, and leave no mark when removed. Hopefully, you have a better understanding of how best to hang acoustic panels to meet your sound treatment needs.