Is the sound in your TV, music, or living room hollow, dead, or full of echo and reverb? Does the sound confusion make listening difficult or uncomfortable? If you’re considering building a DIY sound diffuser for a more harmonic listening experience, we can help!
In this article, we’ll explain what sound diffusion is, how it works, and look at the two most common types of diffusers. We’ll share and review links to 21 different DIY diffusers, plus a few commercial diffuser options. Hopefully, you’ll find something to help with your noise problem.

Contents (Jump to Topic)
- What Is Sound Diffusion?
- How Does Sound Diffuser Work?
- Sound Diffuser vs Absorber
- Sound Diffuser Types
- DIY Skyline Acoustic Diffuser
- 1. DIY Acoustic Skyline Diffuser – Wall Art
- 2. Skyline Diffusors for Living Room
- 3. DIY Modern Skyline Sound Diffuser with RGB Lighting
- 4. DIY Skyline Diffuser
- 5. DIY Skyline Acoustic Diffuser
- 6. Build Your Own Skyline Diffuser
- 7. How To Make A Skyline Acoustic Diffuser
- 8. Building a Skyline Diffuser | DIY Acoustic Treatment/Wall Art
- 9. Make This Skyline Diffuser / Wall Art
- 10. Acoustic Treatment: How to Build a Random Acoustic Diffuser Panel
- 11. Wooden Sound Diffuser [With Arduino PseduoRandomness]
- 12. Build Recording Studio QRD Diffuser
- 13. How to Build a Studio Wooden, Sound Diffuser, Acoustic Panel
- 14. How to Make a Sound Diffuser for under $50
- 15. EASY DIY | Wood Sound Diffuser | Wood Wall Art
- Quadratic Residue Diffuser (QRD)
- Commercial Acoustic Diffusers
- Conclusion
What Is Sound Diffusion?
Sound waves travel outward from a source in straight lines until they encounter objects that absorb the wavelengths or that cause them to change direction. Sounds outside travel in multiple directions due to trees, rocks, walls, and even vehicles absorbing and deflecting or diffusing the waves. In a room, there are usually just flat vertical surfaces that throw the soundwaves back toward the source – such as the speaker of a stereo or TV.
Your TV, stereo, musical instrument, or voice projects soundwaves outward where they travel in straight lines at various speeds or frequencies until they encounter a surface, usually a wall or the ceiling. Horizontal soundwaves striking a flat solid surface reflect back toward the source to create feedback, reverb, and echo.
Those that bounce off the ceiling continue at a different angle until they hit a wall and reverberate back in a distorted mix toward the source. Sound waves that collide where walls meet each other or meet the ceilings create even more destructive interference.
The distance between the soundwave crests and also the height of the crest denotes the frequency and speed of the soundwave. Waves that strike flat surfaces reflect back on themselves, those encountering surfaces with different thicknesses or heights deflect in multiple directions. Even, controlled deflection diffuses and livens the sound so it isn’t hollow or dead.
Sound diffusion is the use of different surface depths and densities to control the wave regardless of its angle of travel and to evenly deflect it in different directions to break its path. The goal is to soften and dissipate sound energy so the speed of reverberation is the same within a room.
Sound diffusion controls the reverb and noise distortion to improve listening pleasure by making the sound clearer. Diffusers can be added to walls and ceilings to scatter wave resonance and treat echo within any high to low range frequency spectrum.
How Does Sound Diffuser Work?
A diffuser provides horizontal and vertical depth to an otherwise flat surface. Some diffusers use channels and others towers and wells to scatter soundwaves up to 180° from the angle of impact. Wavelengths within the high to low-frequency range are diffused in a controlled and predictable way, modulating the direction, timing, and intensity for improved listening enjoyment.
The spacing, width, and height of the tower or depth of the well, or spacing, angle, and depth of the channels are mathematically derived to scatter soundwaves evenly in a predictable manner. The well and tower depths and heights are based on the quarter wavelength rule and widths determined by the half-wavelength rule.
The mathematical formula used to set the pattern, spacing, heights, depths, and widths of the towers and wells or troughs uses prime numbers. Instead of doing the calculations yourself, there are a plethora of plans, diagrams, and instructions available online. Check out the 21 DIY diffuser ideas we’ve highlighted.
Sound Diffuser vs Absorber
Sound diffusers and absorbers are both used to adjust and improve the sound quality in a room, they just work in different ways. Both can be purchased ready-made or constructed by a DIYer at home and placed where they will work best. They can even be used together to control the sound quality.
A diffuser works to redirect the reflected soundwaves away from the listener and to liven a room so it doesn’t sound hollow or dead. It uses towers and wells or channels to control the timing, direction, and intensity of the wave scattering to keep the sound alive but not disruptive. The design is mathematically based to address low and high-range frequencies in a predictable manner. It is commonly made of wood or from formed hard-coated polyurethane foam.
An absorber isolates and absorbs the sound energy and converts it to heat, thus dissipating it so less is reflected back into the room. A sound absorber reduces reverb and echo by lessening the amount of reflected sound. It too makes the room less hollow but doesn’t liven it as a diffuser will. It’s commonly made from rock wool, fiberglass or wool insulation, fabric or cloth, or rubber or foam.
Sound Diffuser Types

Diffusers all use mathematical formulas as a basis of their shape to control sound reflection. They function to control reflection and look great, making them a form of functional artwork. There are five main types of diffusers and most use towers and wells or troughs. The main difference is the mathematical design and placement of materials. The two we consider easiest for DIY construction diffuse sound in one or two directions.
QRD (Quadratic Residue Diffuser)
Quadratic-residue diffusers address a broad bandwidth of sound and diffuse it in one or two directions. It uses strips to form a set pattern of hill-like ridges or towers and valleys, wells, or troughs in calculated widths and depths to control soundwave diffusion in a predictable pattern. The irregular surfaces deflect the sound waves and alter their timing, direction, and intensity, so it doesn’t reflect with the same timing as it would striking a flat wall.
Skyline Diffuser
A Skyline diffuser is so named because it resembles a city skyline of towers of varying heights. The towers are formed from blocks of different calculated lengths to form a skyline of towers and wells or cavities arranged in a predetermined random pattern.
Sound waves strike the different surface depths and are diffused in a controlled even pattern. It is also known as a primitive-root diffuser (PRD) since it is based on primitive roots in theoretic number sequences.
Skyline vs Quadratic Diffusers
Skyline and QRD use different forms of the same technology to control and diffuse soundwaves. Both can be two-dimensional diffusers in that they redirect soundwaves both horizontally and vertically. The Skyline provides a more hemispherical sound field and a QRD a horizontal, vertical, or combination hemicylindrical field. A QRD may be one-dimensional (right-left) or two-dimensional (up-down, right-left), while a Skyline is 2D.
The main differences are due to the mathematical algorithms used to design the sound fields that spatially and temporally disperse or scatter sound waves. The Skyline (PRD) can create too much spray of noise, which is the opposite of what it is intended to do. A QRD works better at spreading out the noise and diminishing the waves reflecting back toward the sound source.
DIY Skyline Acoustic Diffuser
A DIY Skyline diffuser takes planning, preparation, and patience. You need to determine the frequency range to diffuse and select the plan and measurements that will achieve the desired results. The more accurate the measurements and cutting, the better the sound dispersion. Here are eight to check out!
1. DIY Acoustic Skyline Diffuser – Wall Art
This is a larger 2’x4’ diffuser using 4x4s and 4x8s trimmed down to 3”x3” for the towers. The lengths were planned to remove saw marks and then painted. The long pieces were then cut into 120 pieces in the various lengths required for the plan. A 1/2” piece of plywood formed the backing, and the blocks were glued in place according to the pattern plan.
Several blocks were initially left unglued where screws would be used to fasten the diffuser to the wall studs. Brads were also used through the plywood into the blocks to reinforce the glue. Cove molding was added to finish the perimeter seam between the plywood and the blocks. The site includes a list of tools used and a link to plans.
2. Skyline Diffusors for Living Room
Building a series of 8 diffusers for a living room wall for $365US. A calculated pattern was selected for maximum distortion effect. 1-3/4” x1-3/4” (44mmx44mm) pine was chosen for the towers and cut into 1048 pieces in lengths of 8” (20cm), 6” (15cm), 4” (10cm), 2” (5cm), and then sanded. 1/2” OSB in 26-1/4” squares were used for the backer-board.
The towers were glued to the OSB following the pattern. Two opposing corners for each diffuser didn’t require a tower, which made fastening the panels to the wall easier. The panels were fastened to the wall 2-high and 4-wide to create a large diffusion sound field. A link to the diffuser template is included.
3. DIY Modern Skyline Sound Diffuser with RGB Lighting
A large Skyline DIY diffuser with integrated RGB lighting. Explains how to select and use two lengths of 2-by lumber laminated together to make the 3”x3” base material for 2-1/2” square towers of 1”, 3”, and 5” lengths. There are a lot of tips for making the blocks, sanding, and assembly.
The decision to glue the towers to each other instead of a backer-board resulted in glue expansion leaving gaps between the blocks and visible bleed-out, resulting in the decision to dismantle and start over. The towers were trimmed to 2”x2” to remove the glue. The blocks were then glued to a 1/2″ plywood backer-board in the required pattern.
The lighting was added to the voids where no tower was required. Clear coat was sprayed over the towers, trim added, lighting wired, and hangers added. The site includes a source list for some of the materials.
4. DIY Skyline Diffuser
A 24”x24” Skyline diffuser made from 2” thick blue styrofoam board. The diffuser deflects above the 600Hz range and absorbs below it. It is lightweight and to be used to dress a window directly behind the listening position and address the reflecting distortion.
The setup and use of a heat cutter were discussed, as was the importance of ventilation. The foam board was cut into 2” (50mm) strips, which were then cut into tower lengths of 2” (5cm), 4” (10cm), 6” (15cm), and 8” (20cm). Enough pieces were cut to make two panels. PVA glue was used to glue the towers to each other in the pattern chosen.
Cardboard was used as the backer board, and the finished product painted a uniform color. A link to the diffuser plan is included.
5. DIY Skyline Acoustic Diffuser
Making a 12” (30cm) by 43” (110cm) Skyline diffuser using 1-5/8” (4cm) square lumber to make towers 2” (5cm), 4” (10cm), 6” (15cm), and 8” (20cm). The mathematical pattern is included, as is the number of each tower for each height.
The towers were glued at their bases to a plywood board in the mathematical pattern. The plywood was wider and longer than the diffuse block pattern, allowing for wall mounting to any stud pattern.
6. Build Your Own Skyline Diffuser
Building 2’x6’, 4’x4’, and 18”x18” Skyline diffusers for a whole room treatment on walls and ceiling. Discusses the use of a frequency calculator to determine the range of frequencies to treat. The pattern chosen is for voice ranges between 846Hz and 4514Hz. The tower heights are 2”, 4”, 6”, and 8”, and are 1-1/2” square. A 1-1/2” border was left around the 3/4” plywood backer board for mounting.
The towers were cut to length and then given a shed-like roof by cutting at a 30° angle, prior to sanding and gluing. The towers were glued at the base to the plywood, which was clamped to the work surface to prevent curling or warpage. The blocks were placed in the prescribed pattern with the angled roofs placed to be opposing to its neighbor. The plan and material list are included.
7. How To Make A Skyline Acoustic Diffuser
The building of three 18” square Skyline diffusers in the 1500Hz design frequency was discussed and explained. 1-3/8” square towers were cut and sanded before gluing to the 3 plywood backplates. Instead of having the plywood showing at the 0” tower positions, a 1/4″ was added to each tower length, for tower heights of 1/4″, 1-3/8”, 2-1/2”, 3-5/8”, and 4-3/4”.
The finished panels were cleaned and then clear-coated. French cleats were used to mount the diffusers to the wall behind the listening position. A link to a diffuser calculator is included.
8. Building a Skyline Diffuser | DIY Acoustic Treatment/Wall Art
A tutorial on making an 18”x24” Skyline diffuser using 2”x2” lumber. A material breakdown is included toward the beginning of the video. The use of an online calculator was explained and the pattern it provided included.
To have a more uniform look, the 0” towers were replaced with a thin cut piece, and the same thickness added to all other tower height dimensions. The wood was sanded and stained before cutting and gluing to the 1/2″ MDF backer board, and hung with eye-screws and picture wire.
9. Make This Skyline Diffuser / Wall Art
This site explains using 2×4 scrap lumber to make 1-1/2” square 2”, 4”, and 6” towers for an 18”x60” Skyline diffuser. Once the blocks were cut and sanded, they were glued to each other instead of to a backer board to reduce weight. Polyurethane construction adhesive was used to secure the towers to each other.
After the build was completed and the glue dry, a slot was routered across the back for flush mounting a French cleat. A polyurethane clear-coat was applied to seal and finish the diffuser prior to mounting.
10. Acoustic Treatment: How to Build a Random Acoustic Diffuser Panel
This clip explains the building of a 24”x24” random acoustic Skyline diffuser using wine corks on a backer board. Cork has great acoustic properties and wine corks add a decorative flair to the sound treatment. The corks were first cleaned and allowed to dry. Sort the corks by length and diameter, and by vintage label if you wish.
Unused or new corks are easier and quicker. Towers of 1,2, 3, and 4 corks were made by gluing the corkscrew damaged ends together. The towers were glued to the ¾” plywood backer board in a random pattern. Longer towers were also glued to neighboring towers to prevent leaning. The panel was fastened to the wall in the desired location using screws.
11. Wooden Sound Diffuser [With Arduino PseduoRandomness]
Skyline diffusers don’t only have to be from square towers, this video demonstrates building a 12”x18” one using right-angle square-based triangular pieces cut from 1×1 stock. The backer board was a 3/4″ piece of MDF trimmed to different depths using a 3D guided router. 1/4″ MDF could be used instead, and the thickness increased by adding layers in a contour style toward the middle.
The triangles were sanded and divided into groups and stained with different colors. The pieces were randomly glued right, left, up, and down into place. The panel was mounted to the wall with a screw.
12. Build Recording Studio QRD Diffuser
This video depicts the impressive building of two 4’x8’ Skyline diffusers that go together to form an artistic 8’x8’ audio panel, plus the making of four 2’x4’ Skyline panels that go together on the ceiling – the smaller size made mounting easier. The towers were made from European beech wood which was clear-coated prior to assembly.
The towers were glued at the base to a 3/4″ sheet of plywood. The 550-pound panels require heavy-duty hardware to mount to the wall, although they do rest on a frame support. The ceiling pieces weigh a quarter of that and were mounted with four slide-in brackets.
13. How to Build a Studio Wooden, Sound Diffuser, Acoustic Panel
Constructing a 3’x8’ modified mountain peak Skyline diffuser using 2×4 blocks cut at 45° is documented in this clip. The blocks were sanded and hot-glued to 3/4″ plywood in sawtooth rows. Alternating rows of blocks were staggered by half a block to create an artistic sound diffusion field.
The blocks were stained after installation and the diffuser then framed in clear-coated pine. A frame was built to hold the diffuser level on the wall while it was screwed into place, and then the support frame was removed and dismantled.
14. How to Make a Sound Diffuser for under $50
A tutorial explaining the making of a 24”x24” Skyline diffuser for around $50US. Towers were cut from 2”x2” select pine in 1-1/2”, 2”, 2-1/2”, 3”, 3-1/2”, and 4” heights. After sanding, the towers were randomly glued to a 1/2″plywood backer board using Liquid Nails.
D-rings and wire were used to mount the diffuser to the wall. The amount and types of materials used are clearly presented in the video.
15. EASY DIY | Wood Sound Diffuser | Wood Wall Art
A Skyline diffuser using tree branches of varying diameters and cut to different lengths to form the towers and wells is documented in this clip. The towers were randomly glued to a 4’x1-1/2’ sheet of Masonite. Once dry, the whole was sprayed with clear-coat gloss varnish to seal the wood.
The thin board curled some, so the whole panel was then glued to a heavier sheet of 1/2″ plywood, and then mounted to the wall with D-rings. A material list is included in the notes with the clip.
Quadratic Residue Diffuser (QRD)
A quadratic residue diffuser uses parallel ridges or towers and wells of mathematically calculated heights to diffuse soundwaves in a predictable pattern. The orientation of the panel determines vertical or horizontal treatment, so multiple QRDs are often used to form alternating left-right and up-down patterns. The plans reviewed provide a variety of suggestions and a lot of helpful information.
16. Quadratic Diffuser Build
This site explains how to build three 48” (1200mm) x 20” (500mm) x 6” (150mm) N13+4 QRDs using 3mm or 1/8” plywood and polystyrene foam. A complete material list, step-by-step instructions, and tutorial with measurements make this a DIY dream come true. The rigid foam provides support for the plywood and keeps the panels reasonably lightweight.
The highest towers or ridge boxes were manufactured first with the plywood glued to the foam and clamped. The panels were laid out, glued, clamped, and then the exposed foam covered with plywood, and the whole then framed. The finished panels were stained and hung using one of several methods presented.
17. Making A Quadratic Diffuser From Plywood – Acoustics
Building 2 QRDs using 1/2″ plywood, the thicker material makes construction quicker and easier, and possibly less expensive. The wood was sanded and given 2 coats of clear-coat, and then cut into strips to form the wells. A rough assembly guide shows how sections are assembled prior to assembly.
No backer board is required with the use of the heavier plywood either, which is a cost saver. Polyurethane construction adhesive was applied to joints and brads pneumatically driven to hold strips in place. The 3 sections were then connected in a similar manner, and then the top, bottom, and sides pieces attached to finish and frame the project.
The edges were beveled, sanded, and then clear-coated. The panels were then mounted to the walls with 4 screws. There are links to the plan and an article on the build included.
18. How I Built My Quadratic Diffusers
The construction of two 4’x4’ prime 7 QRDs for a sound studio using 1×2 pine to block out the well depths and ¼” underlay for the well sides. The design was determined using an online calculator (link provided) which identified the frequency control range as 704Hz to 4520Hz.
The wells were assembled with brads and then fitted in and nailed to a frame following the calculated pattern. The finished QDR was then spray painted white. The material list and plan are included.
19. How To Build An Acoustic Quadratic Diffuser – DIY
A tutorial explaining how to build a 3’x4’ QRD using 1×4 and 1×2 pine. The pieces were cut to length, and then glue and nails used to fasten everything. The top and bottom were closed with 1×4 to form a frame with the sides.
Four rubber pads were attached to the back corners of the diffusers, and two D rings used to hand it to the wall. Although the construction is demonstrated and material lengths provided, the well depth measurements aren’t, they are eyeballed for fastening.
20. How To: Wood Sound Diffuser Art
A QRD not only moderates feedback, but it’s also a work of art. In this clip, the boxiness of the QRD is altered. The channels are created using scrap 3/4″ pine cut to 2’ lengths and ripped 3-1/2” wide. A wave pattern board was made and set up, and all boards marked using the pattern, but off-set by 1/2″.
The boards were cut out, sanded, and paired to lay out the desired pattern. The pieces were then glued and nailed together to form a 24” by 51” acoustic panel, and then painted. It was hung on the wall using D-ring hangers and hooks.
21. DIY Acoustic Diffuser for Sound Studio
The construction of a 1D QRD wall treatment is documented in this video. Six 2’x2’ MDF backer boards were cut out, sanded, and painted. Oak floorboards were used to form the tower strips. The oak was cut to the width and length required and then sanded.
The oak was glued and nailed to the MDF to form uniform wells. The six panels were then screwed to the wall to form a large 4’x6’ acoustic wall treatment.
Commercial Acoustic Diffusers
There are many different styles and types of diffusers available on the market. Some are Skyline and QRD, while others are binary amplitude diffusers. Regardless of the type, they all work to break the smooth reflective surface of a wall and control the sound resonation in a room.
Sound Absorption-Diffuse Acoustic Panel «Wave»
 Sound absorption-diffusion panels allow some frequency waves through and capture them in foam while others are diffused.
The panels are made of MDF and foam and help control echo and reverb in the range of 200Hz to 5000Hz.
They can be mounted to walls or ceilings of music or rehearsal rooms, home theaters, offices, or conference rooms. The panels are 19.7” square and about 2” deep and are available in ten colors or finishes.
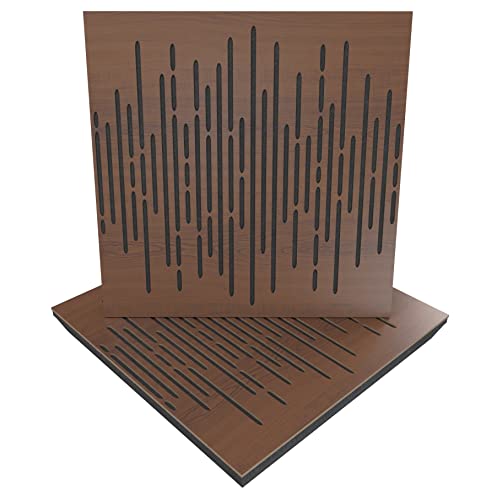
BXI Sound diffuser
 BXI offers a 2D QRD diffuser that looks like a modified Skyline diffuser. The 2D grid of wells of various depths helps decrease reverb, flutter, and echo.
The panels can be mounted to walls or ceilings of music or tv rooms, recording studios, or other rooms.
The panels are 2’x2’x2-4/5” and provide a broadband diffusion from 410Hz to 24571Hz. The panel weighs just under 10-pounds and comes in a satin clear-coat finish.
ATS Acoustic Diffuser
 A 7 well 1D QRD manufactured from birch with a clear-coat finish. ATS’s computer-designed diffusers are precision built to control reverb and echo by scattering frequencies from 325Hz to 3000Hz. The 22-7/8” square diffuser is 6-1/2” deep and weighs 20-pounds.
The diffuser can be fastened to walls to treat sound in a horizontal or vertical direction, or to ceilings. Ideal for sound or music rooms, media rooms, living rooms, or the home office.
Conclusion
A DIY QRD or Skyline diffuser can help reduce flutter, reverb, and echo in a room, livening up the sound and assisting in decluttering feedback. It can also save you a bundle of money.
Hopefully, you found some ideas in the 21 DIY diffusers presented to get your creative juices moving, and that will help solve your noise problems.