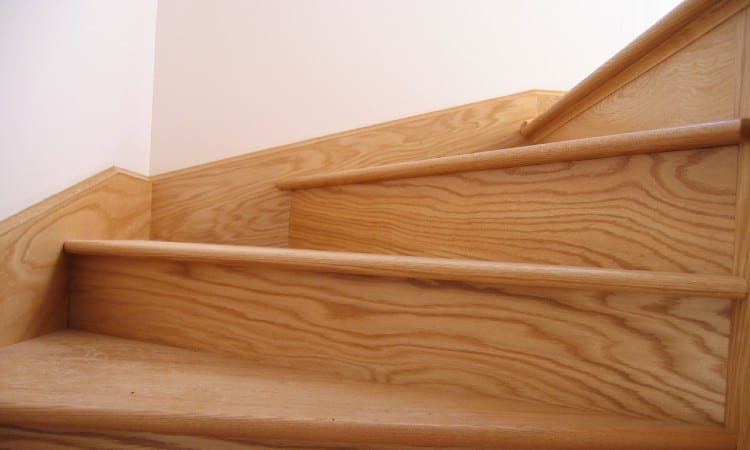
Last winter I finally got around to finishing off the steps into my basement. When I laid out all the materials, I wasn’t sure whether to install stair treads or risers first. I didn’t think it mattered, so I went ahead and installed all the risers first, then the treads. Big mistake, and I’ll tell you why below.
When installing stairs, install the riser first, and then the tread. Start at the bottom of the stairs and work your way up, alternating risers and treads. The back of each tread will sit flush against the riser. Treads and risers fasten with construction adhesive to the subfloor.
There are many different types of stair treads, and some will offer different methods of installation. However, for generic stair treads and risers found at any home reno store, installing the risers before the tread will result in a solid set of stairs.
In this article, we will discuss how to install stair risers and treads, fastening methods, and installation best practices.
Contents (Jump to Topic)
Why Install Stair Risers First?
In this article, when we say “install stair risers first”, it doesn’t mean install all the risers first before the treads. It means that you first install the bottom two risers. Then you install the first tread, which fits above the bottom riser and against the riser behind the tread.
After installing a stair riser, the tread will sit on top of that riser. This allows for a snug fit between the tread and riser without any gaps.
All your risers will sit behind the tread, with the tread flush against the face of the riser behind it. This allows you to screw through the subfloor from behind into the riser and tread, making a solid bond between both riser and tread.
Installation of the riser first allows you to level the tread properly. Stair stringers are not always level, so if you install the tread first, you will have to shim it accordingly if your stair stringers are out of level. By installing the riser first, you can use your level to bring your riser to a height to ensure your stair tread is level.
Pros
- Tread/riser fit is more snug
- Risers can be fastened to treads
- Easier to level the treads
Cons
- Possibly more cuts required for your treads
- The cut edge of the tread is not hidden by riser
Why Install Stair Treads First?
Most carpenters and people knowledgeable about stair installations will instruct you to install your risers first. But if you insist on putting your treads first, there are a few benefits.
If you are installing pre-fabricated stair treads, they are most likely going to be 11 ½” wide. In some instances, you might not even have to cut them lengthwise if your stringers or stair subfloor uses the standard 7” x 11” rise over run found in most modern homes.
The other benefit is that if you have to cut your stair treads to fit a smaller width, say 10 ½”, then you will be able to hide the cut end underneath the risers. The factory cut is always much more “finished” than a cut you would do with your circular or table saw. Therefore your lengthwise cut may result in some cutout or tearing. This will be hidden by the riser on top of it.
Pros
- May not have to cut treads lengthwise
- You can hide your cuts beneath the riser
Cons
- Risers will not fit as well between treads
- You cannot fasten risers to treads
- Treads cannot be leveled using risers
Should You Install Stair Treads and Risers First?
There are many more advantages to installing your risers before your treads. In a perfect world, where everything is square and level, you’d be able to get away with either installation type and not know the difference.
But even in that perfect world, riser first installation will hold up better over time compared to tread first. Let’s take a look at why.
Durability
Installing risers first results in a more long-lasting set of stairs. The primary reason is that when you install risers first, you can cut them to fit the entire face of the stair riser, from top to bottom. Then the stair tread fits snug against the riser – not the subfloor or stringer.
Therefore, you can go behind your stairs and screw through the subfloor and riser and into the stair tread. Now you have fastened the riser and tread together into the subfloor. This will result in a much stronger connection.
And don’t forget, since you’ve hidden the bottom of your riser behind the tread, the likelihood of it ever coming loose is next to nothing. That’s important because stairs withstand more abuse than just about anywhere else in your house.
Aesthetics
If you want your stairs to have a perfect, unbroken “look” without any gaps between stair parts, then installing your risers first is your best bet.
Choosing to lay your treads before your risers will result in you having to fit your risers between the treads. If your subfloor or stair stringers are in any way out of square or level, you’ll have a riser that doesn’t fit perfectly between the treads.
This will result in noticeable gaps that you’ll either have to fill with wood filler or caulk – neither of which are good solutions.
Putting the risers first will also allow you to level your treads. After putting in your first two risers, you can get your level and lay it against the back of the second riser and on top of the bottom riser. If you need to adjust, you can just remove the bottom riser and cut it accordingly and re-install. This will give you a perfectly level tread.
Ease of Installation
While installing treads first might seem more straightforward, it is easier to put your risers first and then treads.
Regardless of what order you install your treads and risers, your tread installation will take more time. Treads are the centerpiece of your stairs and you want them as snug as humanly possible. But once you’ve installed the treads, you’ll have to spend an equal amount of time getting the cuts for the risers exactly right, so there are no gaps.
Instead, fit the risers before the treads. Since the bottom of the risers will fit behind the treads, you have way more room for error on the bottom side of the riser. This makes your installation faster, knowing you’ll just hide that cut anyway. This is much easier than trying to fit the riser between the treads like a puzzle piece.
How to Install Stair Treads and Risers
The actual installation of stair treads and risers shouldn’t take you much more than a day unless you are including a railing, which would make it a two or three-day job depending on the complexity of your stair plan.
Starting at the bottom and working your way to the top is how most people choose to tackle this job. Since the top step sometimes requires a transition piece or extra work to make it mesh with existing flooring on the upper level, it makes sense to finish the steps up to that point and do the final finishing touches after.
Understand that your installation will require nails, screws, and construction adhesive. The adhesive is the most important part of your install – and don’t be shy when using it. Remember, stairs withstand major abuse, so you want them to be rock solid.
You’ll also need access to the back of your stairs to screw through the subfloor into the risers and treads. If this isn’t possible, it isn’t the end of the world. Just be sure to face nail the risers into the stringers.
With all the nailing you’ll be doing, having a finishing nailer on hand is extremely handy. If you don’t have a friend you can borrow one from, then there is always the rental desk at your home reno store or you can splurge and buy one – I can assure you that you will use it more than once!
Lastly, when you’ve almost finished, you’ll need quite a bit of wood filler. When you purchase your treads and risers, make sure you get the filler that matches the wood color and type of your material.
Installing Treads and Risers over Existing Stairs
If you already have a set of stairs and are wondering if you can just install new risers or treads over the top, be advised that your top and bottom step will be out of proportion with the other steps.
Installing over existing steps could work, but remember that the height of your steps doesn’t change. That means that if you have stairs with a 7.5” rise and you opt to put new treads with a thickness of ¾” over the existing stairs, then your final step up to the top will now only have a rise of 6 ¾” – way too shallow for a step. And at the bottom, your first step from the ground will be bigger – 8 ¼”.
Your best bet is to remove the old stair treads and risers to reveal either the subfloor if there is one, or the original stair stringers. Having a clean base to install new material is the best way to retrofit your stairs, as you won’t have to worry about how to affix your new treads and risers to the old ones.
Conclusion
Stair construction can get complicated quickly when dealing with older homes or retrofitting. Before you begin a stair riser and tread installation, follow the manufacturer guidelines for the new materials you purchased before starting.
Some treads and risers follow specific installation guidelines that may differ from the methods I’ve mentioned above. Otherwise, go ahead and install your first two risers and then alternate between treads and risers. Go slow, measure three times before you cut, and make sure your treads are level before moving on to the next one.
Thanks for taking the time to read this article – I hope it helped you with your stair installation project. Comment below or drop me a line with any questions you have about your stair or any other home improvement projects.