PEX plumbing can be a great choice because it is flexible and easy to install because there are not as many connections as alternatives like copper or plastic. However, knowing how to avoid damage is critical; so, do you need to insulate PEX pipe?
You should insulate PEX pipes because they can freeze and potentially burst when temperatures drop below 20 degrees Fahrenheit. This is particularly important in cold regions, crawl spaces, attics, or other cold places. Doing so can also improve energy efficiency and reduce moisture and condensation.
In this article, you will learn when and why you should insulate PEX pipe and what will happen if it freezes. You will also learn how to insulate PEX pipes, good options to do so, and some tips for protecting the piping.

Contents (Jump to Topic)
Does PEX Need to Be Insulated?
PEX pipe is quite resilient and less likely to freeze and burst than many of the alternatives like PVC or copper because it is flexible, it can still freeze when temperatures drop low enough. As a rule of thumb, you should insulate the PEX pipe if there is any chance that it will get below 20 degrees Fahrenheit.
Any exterior PEX pipe like the piping in crawl spaces and attics should be insulated. If it is in interior walls or insulated exterior walls, you generally don’t need to insulate it, but it can be a good idea anyway, especially in very cold climates, because it is more protective in extreme weather situations or loss of power.
Insulating the PEX pipe has other benefits in addition to the prevention of freezing and bursting. It can help to reduce condensation and excessive moisture buildup. This is because when cold or cool water flows through the pipes the warm and humid air outside of the pipes is attracted to them and condenses.
This moisture can drip on your floors and when long-term or overly excessive can form puddles or cause damage to the floor, drywall, and other parts of your home. Insulation reduces the likelihood of so much water building up.
With hot water pipes, insulation can reduce heat loss and may save you up to 4% on your energy bills, especially during cold months! That may not seem like much, but it can add up over time and is significantly more than the time and money it costs to insulate them in the first place.
Water may stay 2 to 4 degrees warmer so you may even be able to lower the temperature setting and can get hot water faster instead of waiting forever when you are just trying to draw a bath or wash dishes. Therefore, it also saves water and money on your bill.
Will PEX Burst if It Freezes?
PEX pipes are cross-linked polyethylene tubing, which is extremely flexible. This is one of the reasons that it is a popular choice for plumbing and they will not freeze as easily as copper or other types of materials used for water pipes.
Not only that, but PEX is 68 times less conductive than copper, which can delay freezing during short-term cold weather. The material also remains flexible during extremely cold weather and will expand with the frozen water inside. This prevents bursting in some situations and makes it less likely to burst than copper or PVC, but that doesn’t mean that the pipes can’t burst.
Like any other type of piping used for water PEX can still burst during extreme events. It can also weaken over time if it freezes often because of the regular flexing and returning to its original shape.
PEX pipe will still be at risk of freezing at 20 degrees Fahrenheit and while that is not enough to burst the pipe on a single occasion, it is not good for them and any pipes that occasionally or regularly face temperatures at or below 20° F should be insulated for this reason.
However, research does show that PEX pipes can withstand and remain flexible at temperatures up to or even below -40° F. This drastically decreases the chances of bursting but does not prevent it completely. Elbows and other fittings, as well as short pieces, can also be more prone to bursting than the other components of the PEX pipe. This is another reason that insulated PEX is safer for you and your home, especially if it is in an area susceptible to cold temperatures.
How to Insulate Water Pipes on Outside Wall From Freezing

Insulating pipes on outside walls or inside walls that aren’t insulated is a critical step to avoid costly repairs, insurance claims, and other problems caused by bursting pipes. This is true of any pipes that are located in crawl spaces, attics, and unheated basements that are otherwise uninsulated.
There are various options for insulating water pipes and each one offers a different R-value, which is a measurement of heat transfer that is important for energy efficiency. The higher the R-value, the more efficient and the less transfer or loss of heat.
After you insulate the pipes, you will also want to check the insulation annually to ensure that it is still in good, effective condition. Sometimes insulation will slide over time as well, which leaves exposed pipes that can be more susceptible to sub-freezing temperatures. Try to check in the Fall before the cold weather hits so you can make sure the insulation is in good enough condition to make it until the rising temperatures in Spring.
These steps will cover types of insulation, but there are different sizes and thicknesses as well. You can find more information about the best insulation for PEX pipe later in the article.
For insulating outside pipes, you will need:
- Duct Tape
- Utility Knife
- Foam Pipe Covers (We Recommend Foam, Self-Seal)
- Insulating Pipe Wrap (We recommend Foam with Rubber backing)
1. First, you will want to make sure that the pipes are relatively clean. While a little grime or dirt is unlikely to prevent proper sticking when using duct tape or other adhesive materials, too much dirt, grease, or moisture should be cleaned off.
When inspecting, also take note of which areas are long straight pieces and where angels and elbows, as well as fittings and any small pieces, are. This will help you determine where to use each type of insulation and prepare for the entire project ahead of time.
2. For short pieces of pipe or places where there are many bends, fittings, and other complications or oddities, you will want to use the insulation strip. There are many types to choose from and not everybody prefers the same type, but we recommend foam with rubber backing. There are also bubble wrap, cotton, foam and foil, and rubber options that you may find works better for you.
Start the insulation by duct taping (or sticking if it is a self-adhesive product) the end of the strip to the pipe. You want to make sure that it won’t come loose from a firm tug. Then, wrap the insulation around the pipe in loops. You should overlap each time around by ½ to 1 inch. This will allow you to completely cover the pipe. Make sure that there are no exposed portions of the pipe.
3. When you encounter a long straight portion or any area where you cannot continue by merely wrapping the pipe, then you will want to use a utility knife to cut the insulation as close to where you want to change directions or types of insulation and secure the end down with duct tape or adhesive backing.
You will also have to do this when the strip of insulation ends. If you want to start another, just make sure to secure it ½ to 1 inch over the previous one so that there is never any exposed pipe.
4. For longer portions of pipe, it is better and easier to use foam pipe sleeves. They are available in different sizes, but most come in 6-foot lengths, which makes your project much easier than doing it with strip insulation that you have to continuously wrap around the pipe.
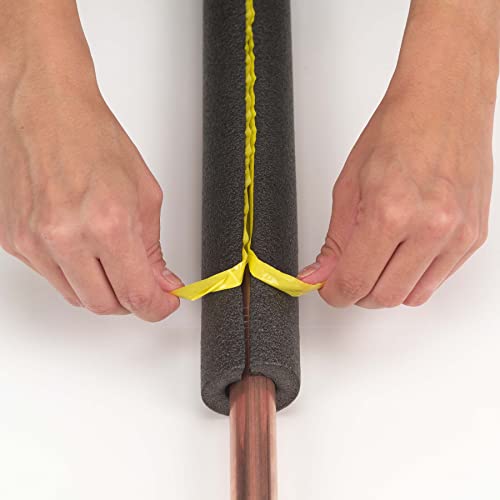
The sleeve will be positioned longways along the pipe. Take the sleeve and carefully pry open the slit and slide it over the pipe. It will automatically close around the pipe as long as it is the correct size.
Now you have to seal the seam using either a self-adhesive strip or duct tape. If using duct tape, make sure you apply it the entire length of the strip to prevent any excessive cold air from infiltrating the insulated areas.
If you have a piece of pipe that is longer than the sleeve, then make sure that they touch together when you use the next one. You can even tape around the meeting point to make sure they don’t slide or that there is no exposure to the elements.
5. When you get to a corner in the pipe, use the utility knife to miter the sleeves or use the strip insulation or pipe wrap to cover fittings. To miter the sleeves, just cut both pieces diagonally so that they seamlessly fit together. If you are switching from sleeves to pipe-wrap, make sure that you tape the pipe-wrap end to the sleeve so that there is not any gap between the two.
6. Finally, when you finish and tape the ends down and get to a faucet, you may want to get either a cover or install a frost-proof faucet. This is especially important in colder temperatures. Faucets are common places where the water can become trapped and burst the pipe. Insulating the rest of the piping does not necessarily prevent damage to this area.
Can PEX Be Used Outside?
If you want to use PEX outside, it cannot be exposed. Buried PEX piping is becoming more common, but there are things to keep in mind if you are thinking about keeping any part of the PEX pipe exposed to temperatures and sunlight.
Sunlight can damage your PEX pipe and make them degrade faster and crack easier. This is the main reason that you should avoid keeping PEX pipes outside. The reason this happens with sunlight is that the UV rays will absorb the chlorine-blocking antioxidants that offer protective features to the pipe material. Fluorescent bulbs can have the same effect but to a lesser degree. 8 hours of fluorescent light is equivalent for these purposes to a minute of sunlight.
Temperatures can be an issue as well if you are considering using them outside. Hot temperatures will not be a problem because PEX pipe can withstand 180° F, but with 20° F weather the pipes can freeze and if this consistently happens, which may be the case with outdoor piping, it can gradually weaken the piping so that they will burst under more moderate conditions.
How to Insulate PEX Pipe in Crawl Space
Crawl spaces can get cold, so you will want to insulate the PEX pipe inside the area the same way you would any outdoor pipe. You can find step-by-step instructions earlier in this article. There are also some other things you can do to insulate the area and prevent extremely cold temperatures and protect the PEX pipe utilized in a crawl space.
Sealing the crawl space can increase the temperature because it will block Wintery air from getting in. You can use foam pieces to cover the walls and the floors and attach them using fasteners and duct tape.
If you are very worried about the PEX pipe in your crawl space, then heating tape is another option. This can also be used only when temperatures are expected to drop much more than usual. Many heating tapes will maintain heat using a self-monitoring sensor. There is manually operating heating tape that you have to plug and unplug as well.
Best Insulation for PEX Pipe
 For PEX pipe, we recommend using foam. Not only does it work well for keeping the heat transfer low, but it is also flexible which allows for the expansion and contraction of the PEX pipe. There are foam sleeves as well as strip or tape insulation available to use.
M-D Building Products have good self-sealing, 6-foot tube insulation available. You do have to make sure that you get the right size, but it is easy to use and works well for almost all locations and project types.
A good strip insulation product for PEX pipe is Cambridge Foam Insulation and it comes in 30 feet in length. It is ⅛ of an inch thick and 2 inches wide, making it effective and easy to use. It is also great for both hot and cold pipes.
Does PEX Pipe Sweat?
Any pipe, including PEX pipe, will condense, or sweat, when the water inside is cold and the air outside is humid and hot. This happens for the same reason that a glass of cold water or other beverage attracts condensation when outside on a hot day. The easiest way to prevent this is to insulate the PEX piping and it offers other benefits as well.
How to Protect PEX Pipe

There are some things that you can do to ensure protected PEX pipes from the elements and other damage. First, never expose PEX pipe to sunlight or any other UV light including fluorescent lights. While it may take a lot of time with fluorescent lighting, any UV rays can degrade and deteriorate the PEX pipes over time.
For any PEX piping that gets cold like those in outdoor areas, crawlspaces, or unheated attics and basements, you should always insulate. This can prevent damage. While PEX pipes are quite resilient to bursting, the connections and other components are not as strong so you want to insulate the entire pipe.
If the PEX pipe freezes, you will want to know how to thaw it properly. First, examine the pipe to look for any visible cracks and if you find any, it is best to call a professional plumber and shut off the main water line. If the pipe has not burst, you can open up cabinets around the pipes, turn on all faucets, and use a hairdryer to thaw the pipes more rapidly. Don’t use it too long or too close, but PEX can withstand up to 180 degrees Fahrenheit so a hairdryer for a short amount of time is unlikely to damage it.
If you lose power when it is really cold, then the interior PEX pipes may be more likely to become damaged and may not have proper insulation because the heat is usually sufficient. If this is the case then you can get heating tape to use temporarily.
Should You Insulate PEX Piping
You should always insulate any PEX pipes on the exterior of your home, in exterior walls that are not insulated, and in any unheated areas with water pipes like crawl spaces, basements, and attics. You can do this using foam insulation tubing and strips very easily and it could save you a big chunk of money by preventing damage and expensive repairs.