Most homes are built with basements made of either poured concrete or concrete block. While both materials are strong, serving as a sturdy foundation for a home, they aren’t particularly easy on the eyes.
While that may not be an issue if the purpose of the basement is to serve as storage or a laundry room, concrete walls won’t do if you’re planning on converting that basement into a den or man cave. While covering the walls in drywall to mimic the rooms in the upper levels of the home is one option, doing so can be complicated and costly.
Fortunately, there are many other options for finishing basement walls, ranging from a simple can of paint to professionally installed basement wall finishing systems. In this article, we’ll go through the alternatives to finishing basement walls without drywall that will help you turn that dark basement into an attractive living space.

Contents (Jump to Topic)
- What Makes Finishing a Basement Wall a Challenge for Drywall?
- What Type of Walls Do Basements Have?
- Drywall Alternatives for Basement Walls
- What Is the Most Affordable Way to Finish a Basement Wall?
- What’s the Best Way to Make a Cinder Block Wall Look Better?
- How Do I Finish a Basement Wall That Leaks?
- What’s the Best Way to Finish an Uneven Basement Wall?
- Conclusion
What Makes Finishing a Basement Wall a Challenge for Drywall?
Drywall is designed to attach to the 2x4s and other dimensional lumber that make up the framing of a home. Since that framing doesn’t exist in the basement, one must create it before covering the walls in drywall.
This multi-step process involves installing sheets of foam board and constructing a wooden frame before finally attaching the drywall. Once it is installed, you’ll still need to mud the joints, then prime and paint.
Sheets of drywall are also heavy, weighing around 50 pounds per sheet, making it difficult to transport into the basement area for installation, especially if the only access to the basement is a narrow stairwell. This all adds to a fairly extensive installation process that many homeowners may not be willing to take on themselves.
What Type of Walls Do Basements Have?
The first step when considering what options you have for finishing those basement walls is first assessing what you have to work with. Basement walls consist of three possible types: masonry wall, poured concrete, and precast panels.
Masonry Wall
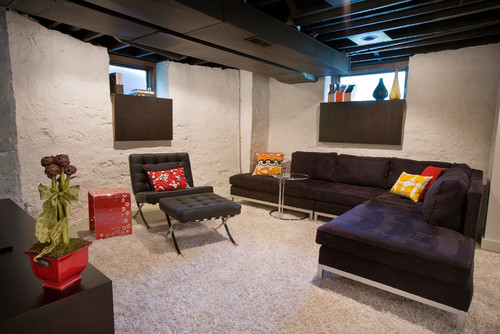
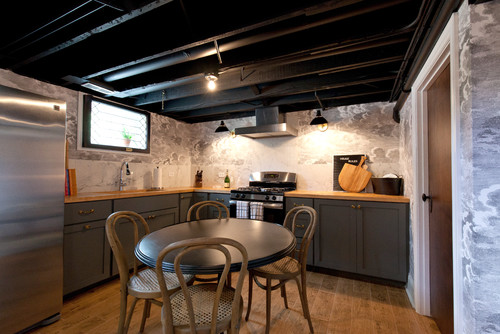
The most affordable basement construction options, a masonry wall basement consists of a wall of concrete cinder blocks stacked upon each other. There are numerous joints where each block connects to the other, creating a rougher surface and more uneven than other types of basement walls.
Poured Concrete
This is the preferred method of basement and foundation construction. A poured concrete wall consists of a smooth concrete surface. This smooth surface makes it easier to finish the wall, whether painting or applying a framework for wall panels. Poured concrete does tend to have small cracks, which can affect certain finishing options.
Precast Panel Basements
This is the least common of the three basement options. These newer options in basement walls consist of a precast slab of concrete that is pre-studded with metal studs along with plumbing and holes for electrical wiring. These integrated studs make it easy to add drywall as the framing to hold it is already in place. If you have this type of wall, you probably already have a finished basement.
Exposed Stone or Brick
If you live in an older home, you may have a stone or brick foundation, which means you have exposed stone or brick for basement walls. Depending on the stone and brick condition, it’s usually best to leave these attractive surfaces exposed and instead focus on cleaning and sealing them.
Drywall Alternatives for Basement Walls
The options for finishing basement walls range from cheap and simple to complicated and expensive. With that in mind, some of the methods below require a fair amount of pre-work to install a frame. This frame consists of either a metal frame or a wood frame.
Metal studs look and function similarly to their wood counterparts but are made from steel. These studs attach to metal tracks that attach to the floor, holding each stud firmly in place.
A cheaper option is to use furring strips, which are 1x2s or 1x3s. You can either purchase furring strips at your love home improvement store or make them out of a sheet of 3/4-inch plywood. To use furring strips as a frame, attach the strips running vertically from floor to ceiling using masonry screws, mounting the furring strips 16 inches apart to mimic studs.
1. Paint
Perhaps the easiest way to change the look of a concrete basement wall is to paint it. Paint replaces that drab gray with color, making the space look more finished. Since masonry is porous, it’s also possible to stain concrete.
Adding color helps to improve the feel of a basement. Use bright light-toned colors to make the basement feel more spacious and welcoming.
Keep in mind that neither paint nor stain will hide the joints in concrete blocks. Both paint and stain are also subject to wear. Paint can chip or peel off of concrete if you select the incorrect type or application. For best results, choose masonry paint or elastomeric paint that will expand and contract with the walls. Staining won’t chip or peel, but it can fade over time unless it is properly sealed.
Make sure to clean the surface of the concrete thoroughly before painting or staining. Apply stain with a sprayer and paint with a roller.
Pros
- Inexpensive
- Quick installation
Cons
- Doesn’t create a finished look
- Paint can chip or peel and stain can fade
2. Basement Panels
With so many people interested in finishing their basement walls, you’d think there would be a product designed specifically for this purpose. There is. Prefabricated walls such as Dricore’s SmartWall are designed specifically for basement finishing.
Basement panels consist of a layer of framing, foam insulation, and drywall with pre-made holes for electrical wiring and plumbing.
The mounting system on the prefabbed wall is designed to attach directly to concrete, eliminating the need for framing. Each 23-inch wide 8-foot high panel connects with a tongue-in-groove joint. Once in place, the drywall side is paintable, giving the whole basement a finished look.
Each panel is also designed to be moisture resistant, protecting the walls and basement from mold.
While it is designed for DIY installation, it can be more challenging and time-consuming than other options on this list. Basement panels also are pricy at the cost of $80 a panel. Installing prefabricated walls in a 15-foot-by-20-foot basement would cost close to $600 for materials.
Pros
- Drywall creates a finished look
- Resists moisture
- Provides added insulation
Cons
- Expensive
- Wall thickness
3. Wood Fiberboard

Installing panels that look like wood is a great way to add a finished look to a basement by covering over concrete. Fiberboard comes in various wood finishes, including lighter grain colors that can help brighten up a basement.
Wood panels are made from three different grades of fiberboards: low, medium, and high density. Choose medium-density fiberboard for basement walls.
Make sure to seal the wall before installing the paneling to prevent moisture from seeping through the wall onto the fiberboard, which will damage it.
Unlike other methods that cover concrete, there is no need to build a framework to support the fiberboard. To install, simply apply paneling adhesive to each panel’s back and press it onto the wall. This type of adhesive comes in tubes that fit into any standard caulk gun.
Pros
- Installs with no framework needed
- Completely covers concrete, creating a finished look
Cons
- Is more susceptible to damage from water seepage
- Paneling can have a dated look
4. Fabric
One of the easiest ways to cover a concrete or cinderblock basement wall is with fabric. This method doesn’t require mixing cement or building a frame or even doing anything with the wall itself whatsoever. There are two ways to use fabric.
You can either glue fabric directly to the wall or attach rods to the wall using masonry screws and hang curtains. If you plan to use fabric, make sure the walls are sealed with a concrete sealant to prevent the fabric from getting wet and breeding mold.
Pros
- Simple installation
- Fabric creates a warm feel
Cons
- If the fabric gets wet, it can breed mold.
5. Vinyl and Wallpaper
Vinyl is an easy and affordable way to transform the look of your basement. Vinyl has an adhesive side that sticks to the concrete wall and an exterior side with a solid color or pattern.
The sheer number of different designs available for vinyl makes it one of the more versatile options on this list Vinyl is also cheap, with rolls costing as little as $7.
Use heavy-duty vinyl for concrete and make sure to prep the surface by thoroughly cleaning it, grinding down any inconsistencies and applying a sealant. Wallpaper is also an option for a basement wall. To install wallpaper, first paint the concrete with a couple of coats of latex primer, then add the wallpaper.
Pros
- Affordable
- Fairly easy to install
- Virtually limitless style and color options
Cons
- Wall must be smooth or abnormalities in the wall will show
- Not as durable as other options
6. Stone Veneer
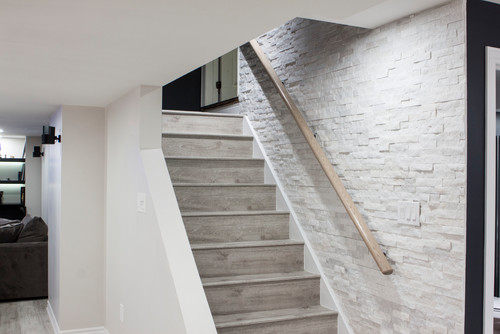
Though one of the more expensive and time-consuming options for covering the basement wall, stone veneers can create a striking look. Stone veneers are used on both the interior and exterior of homes to create the look of stone.
They come as either cultured stone, which is virtually indistinguishable from real stone, and more affordably priced faux stone. Stone veneers are also a good option for covering uneven cinder block walls.
Stone comes in a variety of patterns to create different looks in the basement. While it can be used to cover all walls, it’s also a good option for highlighting a wall or specific parts of the basement, such as a fireplace.
Installation is more challenging with stone veneer. You must mix and spread mortar to attach the veneer and it requires a certain level of skill to achieve good results.
Pros
- Creates a distinguished look in a basement
- Will work with the uneven surface of cinder block walls
Cons
- Can be expensive
- Requires some masonry skills
7. Pargeting
Also referred to as “parging,” this method involves applying a 1/2-inch thick coating of mortar, plaster, or concrete over the concrete blocks to give it a smooth look.
Once installation is complete, pargeting looks similar to stucco. This method is popular with basements with cinder block walls as it will cover the uneven wall while also masking the utilitarian look of cinder blocks.
You can purchase pre-mixed pargeting kits at most home improvement stores or make your own using a mix of cement, sand, and lime.
The parget mix consists of a thick paste that’s applied to the basement wall using a masonry trowel. Although this method is inexpensive, it’s messy and does take some skill to apply the cement, so it achieves the proper look.
Pros
- Inexpensive
- Covers joints in concrete block walls
Cons
- Messy installation involves mortar and grout
- Requires some skill to do right.
8. Exposed Brick
If you’re lucky enough to have exposed brick for your home’s foundation, then rejoice and leave the wall alone.
Exposed brick will give your home an urban loft look that you can accentuate with furnishings. Plus, exposed brick is tough. It can a beating from items being knocked against it and still retain its look.
If you’re not into the red brick color or if your basement lacks enough windows to provide natural light, then consider painting brick with a bright color such as white. The painted brick will still add to the aesthetics of the brick while brightening the basement dramatically.
Brick does have its downsides. The porousness of brick and mortar makes it susceptible to mold issues. Brick will also trap dirt and can be difficult to clean.
If you choose to go with exposed brick, then consider using a sealant to help preserve it. Brick sealants are available at most home improvement stores.
Pros
- Beautiful chic look
- Will take abuse
- Nothing to install!
Cons
- Can absorb moisture, leading to mold issues
- Can be hard to clean
9. Wood Paneling
One way of hiding the concrete wall or blocks altogether is to use wood paneling. While many of us think of wood paneling as the dark faux-wood material that was popular in the 1970s, today, there are many modern styles to choose from.
To install wood paneling, you will first need to prep the wall by installing furring strips. Install the strips horizontally spaced 16 inches apart from floor to ceiling to support the paneling.
Attach the sheets of wood paneling to the furring strips, replacing the drab gray concrete with a wooden wall. For best results, leave that dark wood paneling in the 70s and brighten up the basement by choosing paneling that has light-colored wood grain.
Pros
- Creates a finished look
- Affordable
Cons
- Requires the installation of furring strips
10. Peg Board
Though pegboard may not be the first material one thinks of when considering how to finish a wall, it makes a lot of sense for certain types of basements. Pegboard is commonly found in garage workshops due to its tool storing ability. This makes it a great option for basements used as a workshop.
And, since there are holes throughout the pegboard, it can still allow for adequate ventilation for the concrete wall behind it.
To hang the pegboard, you’ll first need to use the furring strips method described above to create a framework from which you can hang the pegboard. If hanging pegboard on all the walls in a basement may look like overkill, you can mix it in with another wall type.
Pros
- Provides excellent storage space for tools
- Affordable
Cons
- Creates a utilitarian look
- Requires a frame to be built to support it.
What Is the Most Affordable Way to Finish a Basement Wall?
Given its relatively low cost, paint is the best way to finish a basement wall. Most basement walls can be covered with just a couple of gallons of paint, covering about 400 square feet per can, depending on the quality of the paint you purchase.
This makes it more affordable than options that require the purchase of stone veneers, which can cost 6 dollars or more per square foot, wood paneling or siding that can run from $15 to $40 for a 4-foot by 8-foot sheet, or prefabricated walls, which cost about $80 per 2-foot by 8-foot panel.
You’ll also save on time with painting, which doesn’t require installing a framework to support the wall.
What’s the Best Way to Make a Cinder Block Wall Look Better?
While masking the cinderblock wall entirely by covering it with veneer, wood paneling, or drywall is the best way to go, it’s not always feasible. There are easier ways to make a cinder block wall look better without going to such extremes is to paint it.
Since the concrete block is very porous, you‘ll need to seal it before painting it. Use masonry paint, which is designed to adhere to the concrete while creating a waterproof shield that prevents moisture from soaking into the concrete and causing potential mold problems.
Keep in mind that paint won’t eliminate the concrete block seams. For that, you’ll need a different method, such as parging, which involves applying a thin layer of plaster or concrete to the wall, then smoothing it out. This covers all the uneven joints and texture of the concrete block and replaces it with smooth masonry.
How Do I Finish a Basement Wall That Leaks?
Most basement wall finishing options involve putting something over the wall, whether it’s stone or wood veneers, drywall, or paint. In all of these cases, you need to fix any leaks the wall might have before finishing the wall. Covering the wall won’t make the problem go away.
Failing to fix a leak before adding a finished wall will likely result in damaging the finished wall material you’re using, staining a wood veneer or drywall, or causing the paint to peel. Fix any leaks by filling holes with hydrostatic concrete. Apply a sealer to the masonry to serve as a barrier that prevents water from getting in.
Fix any issues with the gutters on the home or the grading around the foundation, as problems in these areas usually cause water to leak into a basement.
What’s the Best Way to Finish an Uneven Basement Wall?
Older homes sometimes have stone foundations and thus stone walls in the basement. That can make it difficult to add drywall, wood paneling, and other wall finishing options that require the installation of a framework. Plus, if you have a natural stone wall, you may just want to keep it. Consider rehabbing the wall to keep the distinctive look of stone.
Chisel out any loose or deteriorating pieces of grout, clean the stone thoroughly, then add fresh grout to rehab the wall. Finally, seal the stone to prevent it from flaking or chipping and to seal out moisture.
Conclusion
Finishing a basement doesn’t have to involve adding framing to concrete walls and hauling heavy panels of drywall down a narrow set of cellar stairs.
There are plenty of different strategies for covering those drab gray walls, running from a simple can of paint to fabric curtains to prefabricated basement wall panels. With options that run the gamut from under $100 to hundreds of dollars, there’s truly a way of beautifying a basement for every budget.
Regardless of what strategy you choose, always make sure to complete the necessary maintenance to ensure moisture doesn’t infiltrate the walls and cause damage to your basement refinishing project.